Arrays are one of the most critical data types in C++ language and an essential topic for most people to learn as it is the first data structure newbies shall use in their programming carrier. Programmers learn arrays while learning C++ to get exposure to arrays and data structures, a renowned field in computer science and programming.
In this blog, we’ll learn about an array, array element, and accessing array element based on the one-dimensional array.
What is an Array?
An Array is made up of multiple values stored in an array called Array Elements. You can think of multiple items stored in a rack, which you can access anytime and in any order you like.
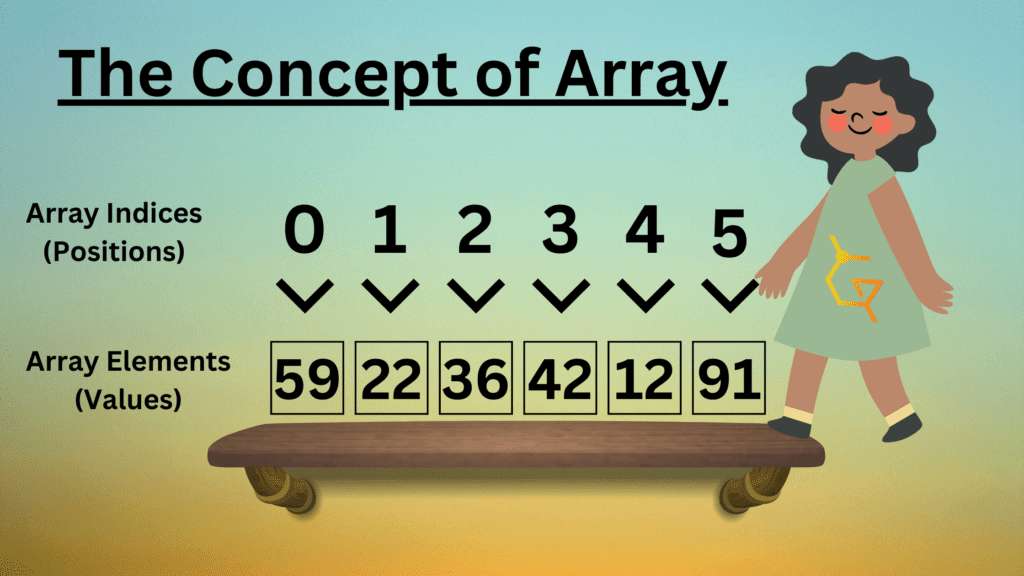
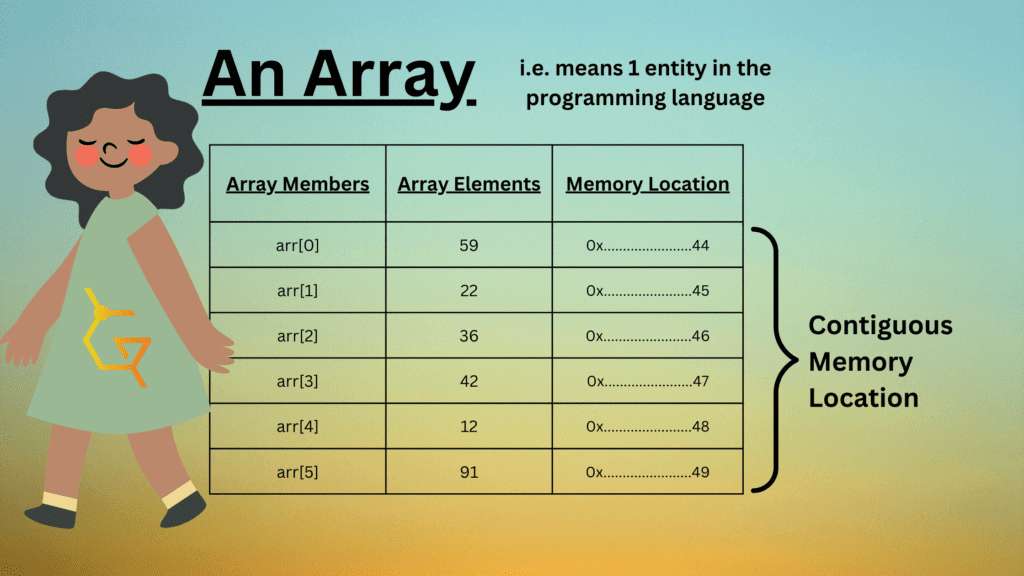
In this image, you can see how an array works and how it is stored in a contiguous memory location.
Core Principles of an Array
- Arrays’ are always started from 0 and go up to the array_size – 1 position. That means if the array size is 6 ( as in the example above). The array range is 0 to 5, where 0 must be the first element, and 5 must be the last.
- Arrays are stored in contiguous memory locations.
- An array is represented as a single entity in the programming language.
Arrays are essentially used for
- Storing data in memory.
- Storing multiple values of the same type.
- Providing fast access to specific elements of an array.
You could also use them to create lists or tables.
An array is useful if you want to keep track of several data items simultaneously within the programming language.
Declaring Arrays
Array declaration is to create and declare an array with some array elements. It can be declared using the following syntax:
Syntax
dataType arrayName [arraySize]; Here the datatype can be of any type like integer, float, character, string, etc.
But the array size must be an integer value as it specifies how many values you will store in an array. The array size must be provided with the square brackets “[]” as these square brackets are meant to be used for arrays in almost every programming language. You can get a clear idea from the following example.
Example
int arr[5];In this example above, we’ve declared an empty array that can store up to 5 integer values. The fun fact is all 5 values have been created and stored in the memory, but the values of all 5 integer elements are 0.
Array Initialization
The initialization of arrays makes arrays worthwhile by storing the data in the memory, hence “initializing arrays.” Initialization is the primary step of array creation, and it’s done using the following example.
Example
int geek[8] = {9, 32, 87, 13, 42, 75,23,1};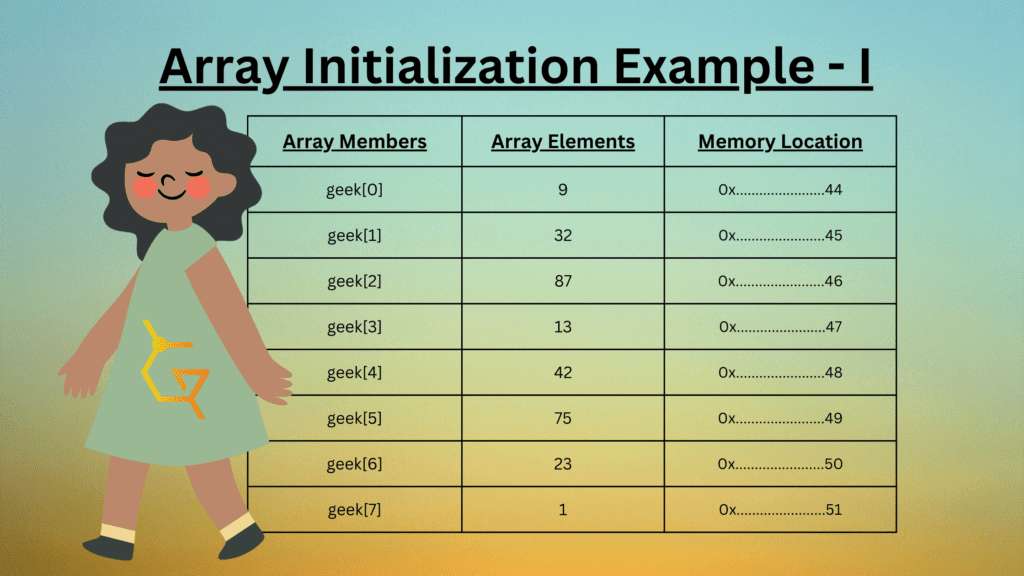
In this example above, we’ve created an array with the corresponding integer values wrapped into the curly braces ordered from 0 to 7 (8 values).
Let’s have another Example to help you understand the array concept more clearly.
Example
int geek[6] = {59, 22, 36}; 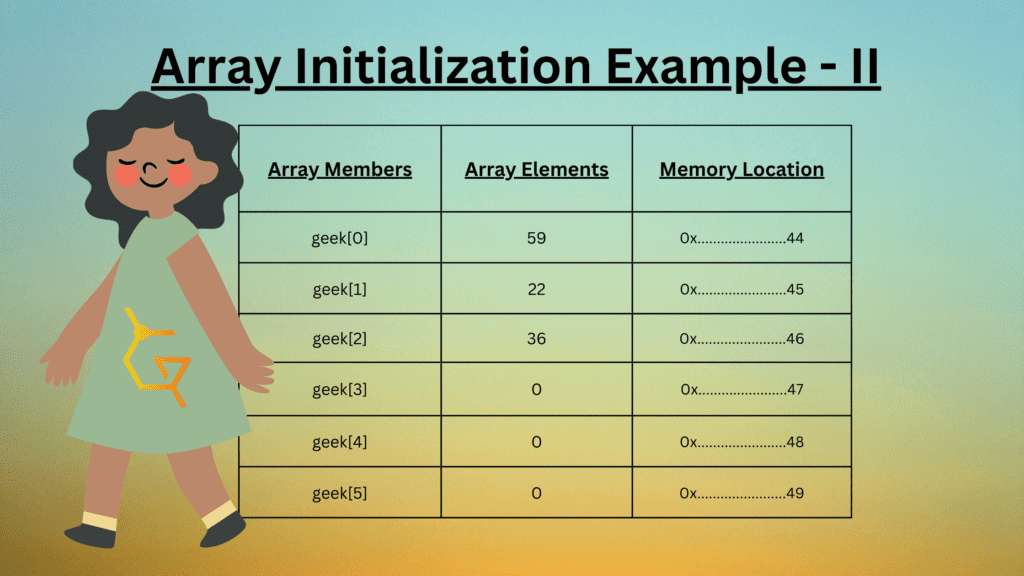
In this code above, we’ve created an array of 6 elements and entered the data of 3 elements; hence it is partially empty, as you can see in the image.
Accessing & Updating Array
We can access an array quickly by using its array members. Array members are a simple way of accessing and updating arrays, allowing us to access the array via array positions. We must remember the indices positions carefully while using the members. Let’s explore how to access array elements using array members by using the syntax below.
Syntax
arrayName[Position];Let’s quickly understand how to access elements stored within the array and learn about updating arrays via a simple, practical program.
The PROGRAM
Program 1: Create and Print an integer array. Then Update and re-print the array you created Manually.
#include <iostream>
using namespace std;

int main(){

    //Part 1: Creating an Array

    int geek[8] = {9, 32, 87, 13, 42, 75,23,1};
    cout<<"Array Created."<<endl;

    cout<<"<--------------------END_OF_PART_1-------------------->"<<endl;

    //Part 2: Accessing & Printing the Array (Manually)

    cout<<"The First Value in the Array is "<<geek[0]<<endl;
    cout<<"The Second Value in the Array is "<<geek[1]<<endl;
    cout<<"The Third Value in the Array is "<<geek[2]<<endl;
    cout<<"The Fourth Value in the Array is "<<geek[3]<<endl;
    cout<<"The Fifth Value in the Array is "<<geek[4]<<endl;
    cout<<"The Sixth Value in the Array is "<<geek[5]<<endl;
    cout<<"The Seventh Value in the Array is "<<geek[6]<<endl;
    cout<<"The Eighth Value in the Array is "<<geek[7]<<endl;

    cout<<"Array Printed."<<endl;

    cout<<"<--------------------END_OF_PART_2-------------------->"<<endl;

    //Part 3: Updating the Existing Array

    geek[0] = 52;
    geek[1] = 39;
    geek[2] = 47;
    geek[3] = 62;
    geek[4] = 71;
    geek[5] = 28;
    geek[6] = 88;
    geek[7] = 21;

    cout<<"Array Updated."<<endl;

    cout<<"<--------------------END_OF_PART_3-------------------->"<<endl;

    //Part 4: Access & Printing the Updated Array (Manually)

    cout<<"The Updated First Value in the Array is "<<geek[0]<<endl;
    cout<<"The Updated Second Value in the Array is "<<geek[1]<<endl;
    cout<<"The Updated Third Value in the Array is "<<geek[2]<<endl;
    cout<<"The Updated Fourth Value in the Array is "<<geek[3]<<endl;
    cout<<"The Updated Fifth Value in the Array is "<<geek[4]<<endl;
    cout<<"The Updated Sixth Value in the Array is "<<geek[5]<<endl;
    cout<<"The Updated Seventh Value in the Array is "<<geek[6]<<endl;
    cout<<"The Updated Eighth Value in the Array is "<<geek[7]<<endl;

    cout<<"Updated Array Printed."<<endl;

    cout<<"<--------------------END_OF_PART_4-------------------->"<<endl;

    return 0;
}
Output
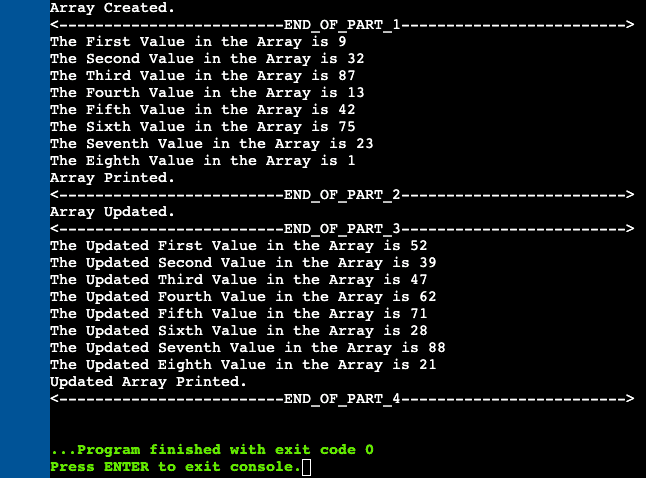
Explanation
Note: You must run this on OnlineGDB.com and consider typing it all rather than copying it to gain a clear understanding and practical exposure.
We’ve made this code as simple as possible, and you could also use loops and take user inputs to make this code more exciting and sensible. But we’ve made it for clear understanding; hence, we’ve kept it simple.
This code is divided into 4 simpler parts making it easily readable.
In the first part, we created an array and printed a simple statement. To keep it clean, we’ve also included the end of part one. That’s simple and clear.
    //Part 1: Creating an Array

    int geek[8] = {9, 32, 87, 13, 42, 75,23,1};
    cout<<"Array Created."<<endl;

    cout<<"<--------------------END_OF_PART_1-------------------->"<<endl;
In the Second part, we’ve printed all the elements of the array using the cout and the array members with some endl to keep the code clear. And ending the part with another statement. Simple as it could be.
//Part 2: Accessing & Printing the Array (Manually)

    cout<<"The First Value in the Array is "<<geek[0]<<endl;
    cout<<"The Second Value in the Array is "<<geek[1]<<endl;
    cout<<"The Third Value in the Array is "<<geek[2]<<endl;
    cout<<"The Fourth Value in the Array is "<<geek[3]<<endl;
    cout<<"The Fifth Value in the Array is "<<geek[4]<<endl;
    cout<<"The Sixth Value in the Array is "<<geek[5]<<endl;
    cout<<"The Seventh Value in the Array is "<<geek[6]<<endl;
    cout<<"The Eighth Value in the Array is "<<geek[7]<<endl;

    cout<<"Array Printed."<<endl;

    cout<<"<--------------------END_OF_PART_2-------------------->"<<endl;
The third part is interesting as we manually updated the arrays’ values using the array members. The code is simple, just like the variables, if you look at it carefully. Nothing extraordinary.
    //Part 3: Updating the Existing Array

    geek[0] = 52;
    geek[1] = 39;
    geek[2] = 47;
    geek[3] = 62;
    geek[4] = 71;
    geek[5] = 28;
    geek[6] = 88;
    geek[7] = 21;

    cout<<"Array Updated."<<endl;

    cout<<"<--------------------END_OF_PART_3-------------------->"<<endl;
Finally The Fourth Part, we’ve re-printed the updated array and an ending statement, just like in the Second part. The program is sorted, simple, and clean to understand.
    //Part 4: Access & Printing the Updated Array (Manually)

    cout<<"The Updated First Value in the Array is "<<geek[0]<<endl;
    cout<<"The Updated Second Value in the Array is "<<geek[1]<<endl;
    cout<<"The Updated Third Value in the Array is "<<geek[2]<<endl;
    cout<<"The Updated Fourth Value in the Array is "<<geek[3]<<endl;
    cout<<"The Updated Fifth Value in the Array is "<<geek[4]<<endl;
    cout<<"The Updated Sixth Value in the Array is "<<geek[5]<<endl;
    cout<<"The Updated Seventh Value in the Array is "<<geek[6]<<endl;
    cout<<"The Updated Eighth Value in the Array is "<<geek[7]<<endl;

    cout<<"Updated Array Printed."<<endl;

    cout<<"<--------------------END_OF_PART_4-------------------->"<<endl;
The Program
Program 2: Create and Print an integer array using basic loops. Then Update and re-print the array you created using loops.
#include <iostream>
using namespace std;

int main(){

    //Part 1: Creating an Array

    int geek[8] = {9, 32, 87, 13, 42, 75,23,1};
    cout<<"Array Created."<<endl;

    cout<<"<--------------------END_OF_PART_1-------------------->"<<endl;

    //Part 2: Accessing & Printing the Array (Using Basic Loop)

    for (int i=0;i<8;i++){
        cout<<"Geek Array's Value at "<<i<<": "<<geek[i]<<endl;
    }

    cout<<"Array Printed."<<endl;

    cout<<"<--------------------END_OF_PART_2-------------------->"<<endl;

    //Part 3: Updating the Existing Array (Using Basic Loop)

    for (int i=0;i<8;i++){
        cout<<"Enter New Geek Array's Value at "<<i<<": ";
        cin>>geek[i];
    }

    cout<<"Array Updated."<<endl;

    cout<<"<--------------------END_OF_PART_3-------------------->"<<endl;

    //Part 4: Access & Printing the Updated Array (Using Basic Loop)

    for (int i=0;i<8;i++){
        cout<<"Updated Geek Array's Value at "<<i<<": "<<geek[i]<<endl;
    }

    cout<<"Updated Array Printed."<<endl;

    cout<<"<--------------------END_OF_PART_4-------------------->"<<endl;

    return 0;
}
Output
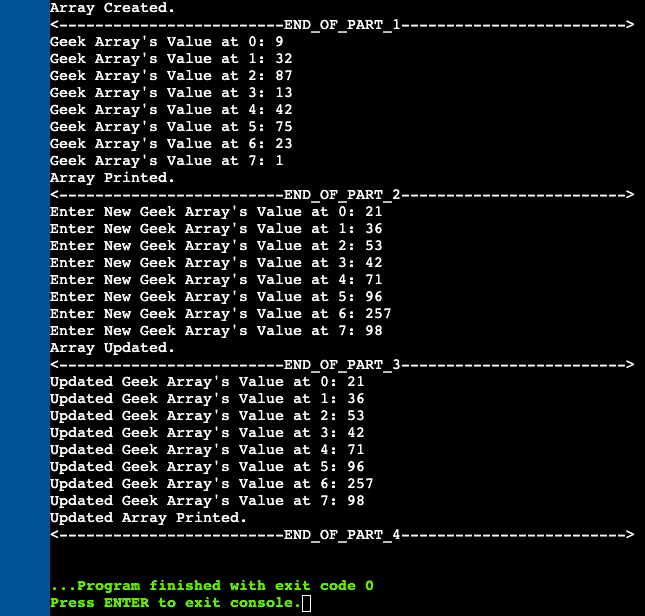
Explanation
Note: You must run this on OnlineGDB.com and consider typing it all rather than copying it to gain a clear understanding and practical exposure.
This program is an advancement to Program 1; we’ve tried to keep it simple again so you can learn everything quickly.
This code is again divided into 4 simpler parts making it easily readable.
In the first part, we created an array and ended with a closing statement of “array created,” followed by the end of part 1 for increasing readability. nothing else.
    //Part 1: Creating an Array

    int geek[8] = {9, 32, 87, 13, 42, 75,23,1};
    cout<<"Array Created."<<endl;

    cout<<"<--------------------END_OF_PART_1-------------------->"<<endl;
In the Second part, we’ve used the for loop to iterate through the array for printing every value it contains. We’ve run the loop from 0 (the first value of the array) to 8 (the last value of the array), but if you notice it carefully, we haven’t included the 8th part as it is not part of the array.
for (int i=0;i<8;i++)the “i” (iterator) runs until 8, i.e., less than 8. Hence it is not including the 8th part; revise the relational operator to understand it deeply. Therefore the loop runs through every value from 0 to 7, which is the size of the array.
Then we inserted an output statement by putting the position at “i,” as it will print the array element’s value by putting the position as “ith element” of the loop. Ending the program with array printed and end of part 2 again for cleanliness and increasing readability.
    //Part 2: Accessing & Printing the Array (Using Basic Loop)

    for (int i=0;i<8;i++){
        cout<<"Geek Array's Value at "<<i<<": "<<geek[i]<<endl;
    }

    cout<<"Array Printed."<<endl;

    cout<<"<--------------------END_OF_PART_2-------------------->"<<endl;
In the third part, again, we’ve used the same loop to enter the values of the arrays where the position and the array values are inserted using the iterator.
    //Part 3: Updating the Existing Array (Using Basic Loop)

    for (int i=0;i<8;i++){
        cout<<"Enter New Geek Array's Value at "<<i<<": ";
        cin>>geek[i];
    }

    cout<<"Array Updated."<<endl;

    cout<<"<--------------------END_OF_PART_3-------------------->"<<endl;
Finally, in the fourth part, we reprinted the array using the same method in the second part and completed the program, thanks to the for a loop.
//Part 4: Access & Printing the Updated Array (Using Basic Loop)

    for (int i=0;i<8;i++){
        cout<<"Updated Geek Array's Value at "<<i<<": "<<geek[i]<<endl;
    }

    cout<<"Updated Array Printed."<<endl;

    cout<<"<--------------------END_OF_PART_4-------------------->"<<endl;
Conclusion
In this blog, we’ve learned about single-dimensional array in C++. In the following blog tutorial, we may learn about multidimensional arrays with easy-to-learn and graspable programs for two-dimensional arrays and the core concept of using the multidimensional array as a database. So make sure to check the following blog out to learn multidimensional array in C++. I hope you’ve experienced a new way of learning the core concepts as we try new ways and push ourselves hard. But technically, you’ve learned almost everything about arrays at the primary level and got the practical understanding by running a 4-part program to enhance your programming skills.
You can also show us your love on social media, i.e., Instagram, Facebook, Twitter, and Linkedin, and you shall also check out our new blogs regularly. We’re also trying hard to provide the best content using premium tools. We’re expecting you to share our website using word of mouth if you find our content worth sharing; you can also share using social media, which will genuinely help us a lot. We’re counting on you for the support of our website, and stay geeky until next time.


