The programming world is about the accuracy and precise flow of the code written by the developer, as it is directly proportional to the programmer’s integrity and skillset. In this blog, we’re going to learn about C++ break statements, and as we progress throughout the course, we’re taking control of the program and becoming more and more precise in the field of programming to become better programmers for the future.
We need to learn about the two essential concepts of the programming control flow to strengthen the grip and learn more about taking control of the program flow. To control the program’s flow and lead the program in the direction we want. Break and Continue are two critical statements we must learn to enhance the program control skills. This blog is about C++ break statement, how it works with diagrammatical explanation, syntax, working of break statement with loops, and most importantly, working of break statement with switch statement.
Break Statement

The Break statement terminates the current iteration wherever necessary. It is majorly used with loops and switch case statements.
Loops have a major significance in break statements as they make applying various logic much easier to implement.
It is also a major component in switch-case statements, as it is not possible to use switch statements without break, making the break statement a necessary component in the switch statements.
Diagram

Explanation
This diagram will help you to establish the foundation of how break works:
- Beginning with the program flow entering the loop, it faces whether it has to go inside or skip it.
- When it enters the while loop and executes the loop body completely, there comes a situation powered by our beloved if else condition.
- If the situation enters inside the if statement, then the current loop iteration and the current loop will be terminated right away without even considering the satisfaction of the loop condition, and the remaining program flow will be continued.
- Otherwise, the loop will continue as it should until it satisfies the loop condition.
Syntax
Break Statement with Loops
The break statement is majorly used with loops to terminate the program flow in between wherever needed, according to the logic of the program.
It is majorly used with conditional statements to control the program flow and give the correct direction to increase the program’s efficiency and accuracy, hence reducing the scope of exceptions and errors.
Simple Loops
Simple Loop/Normal Loop/Standard Loop means simple for, while, do-while loop without sub-types and complications like the nested loop, infinite loop, etc. Break statements can be implemented in any type of loop. Still, here we’re considering a simple illustration of how to implement break statements in simple loops and how the break statement works in this situation.
Example:
#include <iostream>
using namespace std;

int main(){

    for (int i=1;i<=15;i++){
        if(i==9){
            break;
        }
        else{
            cout<<i<<endl;
        }
    }
}
Output:
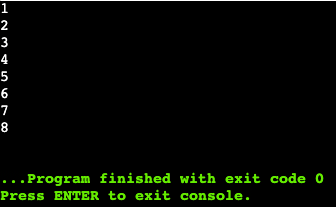
Explanation:
Simple Loops with simpler explanations for simple geeks:
- Getting inside the for loop in the first place, where the iterator runs from 1 until 15 (including 15), and the iterator is incrementing on the default rate, i.e., 1.
- Inside the for loop, the if-else condition welcomes us, stating that if iterator “i” becomes 9, it will break the loop. Otherwise, it will print the numbers.
- It’s an elementary program printing numbers from 1 to 15 in ascending/counting order. Still, the catch is that the numbers will be printed until 8 only as the loop is terminated forcefully when the iterator proceeds toward 9.
- You can edit 9 and change it to any number you want the loop to terminate. Always try playing with the program a bit, as it is the best source of learning, instead of reading this blog and copying and pasting the codes on the compiler.
Nested Loops
Nested loops are used to increase the code’s efficiency and open a gateway and numerous possibilities for new concepts. By including the ingredient named break statement in the nested loops dish, the situation and the possibility gets to the next level, making the final dish much tastier than expected. And from the chef’s perspective, it gets much easier to implement the recipe because of the break statement itself.
You must be able to interpret that by a chef, I mean programmer, and the break statement makes it much easier to control the program flow, even in nested loops. Let’s understand it with another geeky example.
Example:
#include <iostream>
using namespace std;

int main(){

    for (int i=1;i<=5;i++){
        cout<<"Table of "<<i<<endl<<endl;
        for (int j=1;j<=10;j++){
            if (i==4){
                break;
            }
            cout<<i*j<<"t";
        }
        cout<<endl;
        cout<<endl;
    }
}
Output:
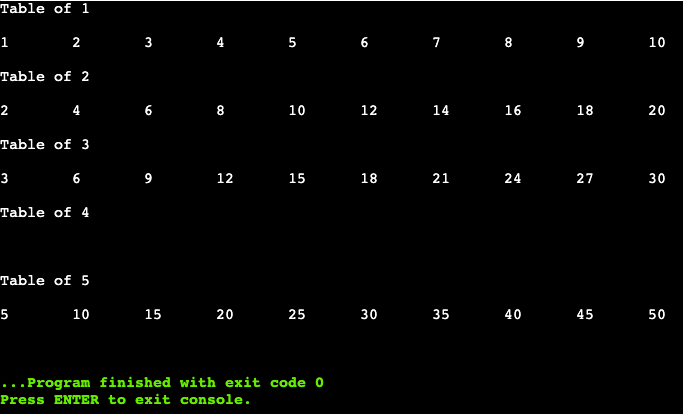
Explanation:
Getting towards the nested loop as this program could seem a little extra, but still, it’s a piece of cake:
- Getting the first for loop, i.e., the outer loop, which has the iterator initializing at 1, running until 5 (including 5), and incrementing by 1 as usual.
- Printing the heading “Table of iterator i,” and here, the innermost loop comes into play, the inner for loop. It initializes the iterator j from 1 to 10 (including 10) with a simple increment of j by 1.
- These loops print the mathematical tables from 1 to 5 with the heading. The catch is it will not print the table of 4 because when the “i” turns 4 and the “j” starts the iteration, it will be terminated by break;
- Hence the full table of 4 will be terminated, and the iterator will move ahead to 5 and execute until the loop is supposed to run.
- Here also, you must try playing with the code to learn how the programming works and how your intervention affects the program’s logic, as it is yet the best source of learning, instead of just reading, copying, and pasting the codes on the compiler.
Break Statement with Switch Statements
As the break statement is not an exception but a necessity for the switch-case statement, You should consider the blog of the switch-case statement (click here) to learn how the break statement works with/in switch statements.
Program: The Prime Number Checker
#include <iostream>
using namespace std;

int main(){

    //Part 1: Initialization & Accepting User Data

    int num;
    cout<<"Enter Number: ";
    cin>>num;
    bool prime = true;

    //Part 2: The Evaluation

    for (int i=2; i<num ;i++){
        if (num%i==0){
            prime = false;
            break;
        }
    }

    //Part 3: The Results

    if (prime){
        cout<<num<<" is a prime number!"<<endl;
    }
    else{
        cout<<num<<" is not a prime number!"<<endl;
    }
    return 0;
}
Output 1: Not a Prime Number

Output 2: Prime Number
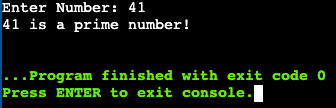
Explanation
This program has been taken from for loop blog. If you would like a complete understanding, you can visit the for loop blog here.
Note: Please make sure to code and run the program manually on onlinegdb for better practical exposure.
Objective: This program will take user input, evaluate and let you know whether the number entered by you is a prime number.
This code could feel a bit complex to the newbies, but you’ll have to get to complex code now to strengthen your coding journey:
- In the first part, we initialize a variable named “num,” accept a user value, and store the value in “num.”
- The exciting part here is we’ve also created a boolean variable named “prime,” which has been valued at “true.” This means we’re assuming that the number will be the prime number initially. But wait and let the actual game begin.
    //Part 1: Initialization & Accepting User Data

    int num;
    cout<<"Enter Number: ";
    cin>>num;
bool prime = true;- In the second part, the evaluation begins. Inside the for loop, the iterator begins from the value 2 and will go until the number provided by the user (excluding the number itself).
- As we know, a prime number is any number that does not get divided from any number excluding the number 1 and the number itself. Therefore as per the definition of prime number, the for loop starts at 2 until the number itself (num variable) where the “num” is excluded.
- In the first part, we’ve already presumed that our number is prime initially. Inside the for loop, we’re validating whether our number is prime or not.
- As we already know, the iterator is running from 2 until the num and inside the if statement every time it is being checked whether the number “num” is getting divided by the iterator. This means it checks whether the number is divisible from 2 until the number itself.
- If the number does not get divided anywhere, the prime’s boolean value remains true, as the number is indeed a prime number; therefore, the loop is terminated.
- If it gets divided anywhere, the value of the boolean variable prime is overridden to false. The break statement is executed to exit the loop and stop the current iteration forcefully. The break statement is crucial as it terminates the loop right away.
    //Part 2: The Evaluation

    for (int i=2; i<num ;i++){
        if (num%i==0){
            prime = false;
            break;
        }
}- In the third part, the conditional statement awaits to declare of the evaluation results. If the value of the prime variable remains true in the for loop, then the number will be printed as a prime number, as if the block will be executed.
- Otherwise, if the value of the prime variable is changed to false, the else block will be executed, and hence the number will be printed as the non-prime.
    //Part 3: The Results

    if (prime){
        cout<<num<<" is a prime number!"<<endl;
    }
    else{
        cout<<num<<" is not a prime number!"<<endl;
    }
    return 0;
}
Conclusion

In this blog, we’ve thoroughly gained knowledge of the break statements and gone through the concepts of the break in normal and nested loops. The break statement is also used in the switch statement but is extensively covered in the switch case blog. We’ve also gone through some real-life examples, programs, and diagrams that should help you to solve the framed interview questions.
In the upcoming blogs, you’ll get exposure to continue statements and switch statements. This will complete the entire tutorial series course for C++ beginners to intermediate. After the C++ beginners to intermediate, the geeks plan to expand the peak with more extensive tutorials to enhance the learning base and provide more exclusive and practical learning.
This is also one of the most detailed blogs ever, and it took a lot of money & effort to upgrade the blog’s quality to this level. We’ve just begun. We’ve constantly improved the quality to enhance your experience, which shall require your support, and we expect it from you.
We shall start accepting donations soon as we’re spending heavily on the website’s maintenance and super high-quality content creation & research of the website. You can now support us through the like button on the bottom, sharing this blog, disabling ad blockers, commenting on your thoughts, and connecting with us on socials.
You can also support us by visiting this blog and buying the reviewed services (They’re self-tested and the best in the market), which will help us grow, develop, and upgrade the content quality to the next level. You may also subscribe to our newsletters, check out our latest blogs from other niches, and hit a like (heart) below the blog. Perfect Goodbye for now, and enjoy the ever-best programming blog series only at GeekonPeak!