The looping statements are the most crucial concept to control and manipulate the program in the programming language. In this blog, we will learn about C++ while loop. As conditional statements are significant in providing direction to the program and maintaining the programming flow. Similarly, Looping statements also play a crucial role in iteration and the number of times a program is supposed to be executed. We wouldn’t be able to execute advanced programs without loops. Here’s a quick geeky brief about loops:
- Looping means repeating a block of code until the condition is satisfied.
- Looping is also a part of control flow statements and conditional statements.
- In the conditional statements, we enter the block which satisfies the condition.
- In loops, the code enters the loop block and executes the line of codes repeatedly when the existing condition is already true with the loop condition, then exit the block when the condition is satisfied (turns false).
- There are mainly three types of loops – for loop, while loop, and do-while loop.
- This blog mainly focuses on one significant type of loop with its various subtypes, i.e., while loops; hence, let’s dive deeper by understanding what exactly these while loops are and how they work.
This is one of the best and the most detailed blog written by the author,i.e., “Kritish” (me), to date. This could also be the best C++ while loop blog on the web. So please read this C++ for loop blog carefully and like (heart button on the bottom) and comment about the blog on our website.
While Loops
While loops are also among the most used loops in C++, as it is one of the primary loops in almost every major programming language. Unlike for loop, we don’t have an inbuilt iterator (loop variable) here; instead, we need to manually create and update the iterator.
There are various subtypes of the while loop,i.e., do-while loops, nested while loops, and infinite while loops. We’ll learn about while loops, nested while loops, and infinite while loops. We’ll cover all these topics with examples, outputs, syntax, diagrams, programs, and more.
We shall cover the do-while loop in the next blog, as it’s a huge topic. Until then, this blog will focus on the while loop and its subtypes.
IMPORTANT NOTE: In this blog, some terms are used, like the condition is satisfied and the condition is not. We want to provide some extra clarity on that for better understanding.
- If the condition is not satisfied, that means the condition is returning true with the situation, or the program flow is turning out to be true with the condition, which means the program flow will enter inside the code block to iterate through the loops statement and satisfy the condition again and again until the condition turns out to be false.
- Suppose the condition turns out to be satisfied. In that case, it means the condition is returning false with the situation, or the program flow is turning out to be false with the condition, which means the program flow will not enter the code block as the condition is already satisfied; therefore, it will skip the loop and continue the remaining program flow.
Diagram
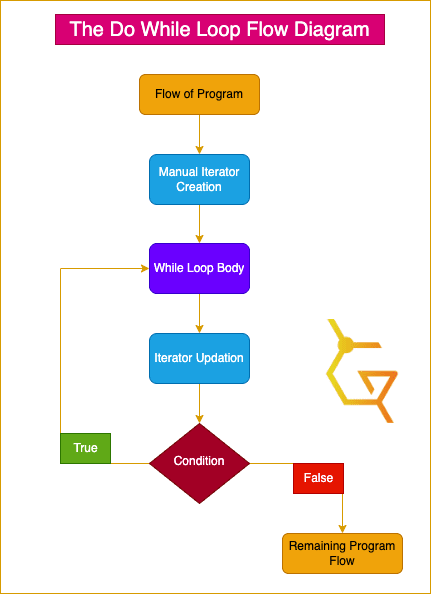
Explanation
Let’s get deep inside the diagram and its significance:
- Beginning with the program flow, creating a manual iterator; As in the while loop, we need to create an iterator manually, unlike for loop where we get an inbuilt iterator.
- After the iterator creation, the while loop is initialized with the condition, and the condition is checked. Therefore the condition is compared with the iterator to evaluate the program flow.
- If the condition turns out to be true, it will simply execute the while loop conditions and update the iterator manually. And again, re-check whether the condition is satisfied or not. It will repeat the execution and keep checking until the condition becomes satisfied (condition becomes false).
- If we do not update the iterator manually, the program will be stuck into a condition known as an infinite loop because the condition will never be satisfied.
- If the condition turns out to be false (which means it is already satisfied), it will simply skip the while loop block and execute the remaining program flow.
Syntax
Explanation
Let’s understand the simple syntax of the while loop:
- Firstly, the iterator variable is initialized to 1. It is up to the user; you can initialize it to 0 or any number you want.
- Then the while loop is called, the condition will be checked within it, and the loop will continue executing according to the condition.
- If the code block inside the loop is executed, then the iterator will be updated as well, unless it will be stuck into an infinite loop.
Example
#include <iostream>
using namespace std;
int main(){
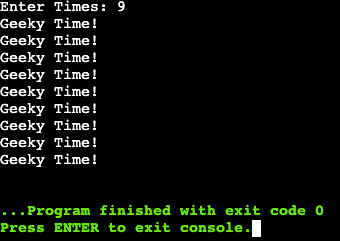
int times {0};
cout<<"Enter Times: ";
cin>>times;
int i=0;
while (i<times){
cout<<"Geeky Time!"<<endl;
i++;
}
return 0;
}Output
Explanation
Let’s get into this sneaky little code:
- Here, we’re beginning with taking user input on the number of times the word “Geeky Time!” has to be printed on the screen.
- Then, simply, we’re initializing the iterator at 0 and the condition where the iterator will loop the code block until it reaches the target (excluding the target as there is no = sign). However, the iteration times will be accurate as the iterator starts from 0; hence 0 will be included. For example, if we enter 8, it will run from (0-7), i.e., 0,1,2,3,4,5,6,7, therefore 8 iterations.
- The “Geeky Time” will be printed n number of times as specified.
- In the next step, the iterator is incremented.
- And the condition will be executed until satisfaction.
While Loop Versus Do-While Loop
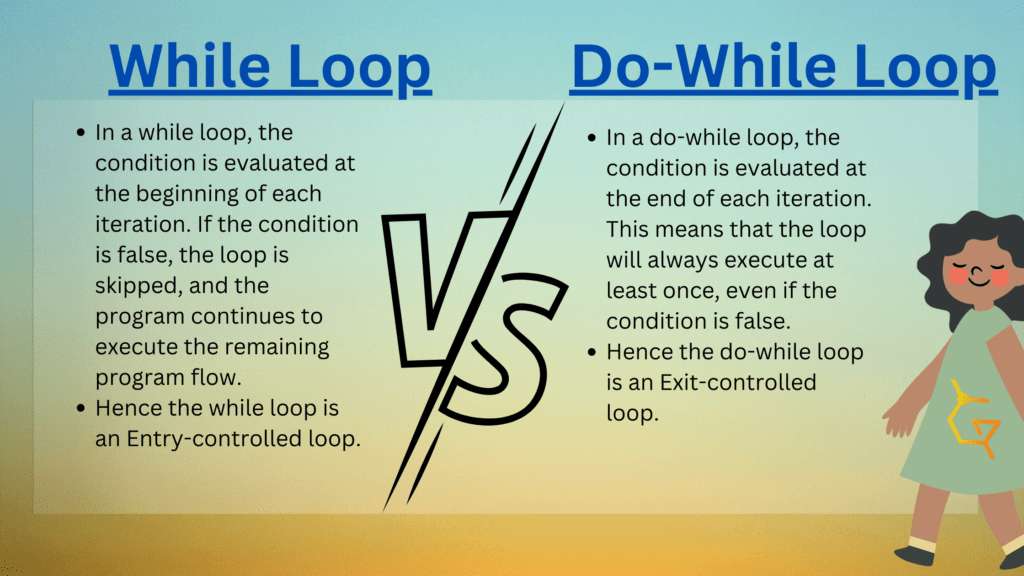
Before diving deeper, let’s understand the basic difference between the while and do-while loop.
The major difference between a while and a do-while loop is the position of the loop.
As in the while loop, the loop condition is placed on the top of the body; that’s why the loop checks are evaluated before entering the loop body, making the while loop an entry-controlled loop.
Whereas in the do-while loop, the loop condition is placed on the bottom of the body, which makes the evaluation after the execution of the loop at least a single time, making the do-while loop an exit-controlled loop.
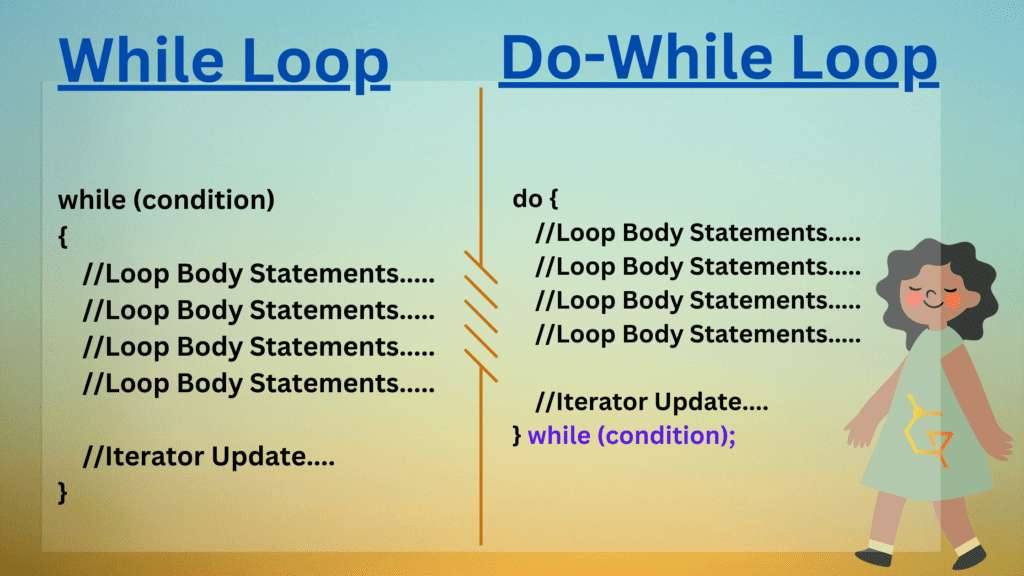
Here is the syntax of both loops for better understanding and reference.
Nested While Loop
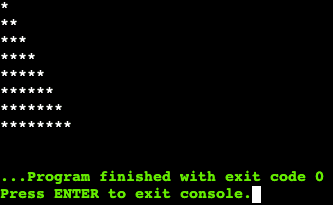
The Nested while loop is simply a loop inside a loop. The inner loop can be used to execute multiple statements within the body of the outer loop. The inner loop executes all its iterations for each outer loop iteration. For example, when printing a multiplication table or solving the star pyramid questions.
#include <iostream>
using namespace std;

int main(){
    int i=1;

    while (i<=8)
    {
        int j=1;
        while (j<=i)
        {
            cout<<"*";
            j++;
        }
        cout<<endl;
        i++;
    }


    return 0;
}Output
Explanation
This program is simple to learn but could seem a bit complex to newbies:
- Inside the main function are two while loops simultaneously, i.e., the outer while loop and the inner while loop.
- In this code, firstly, we’ve defined the iterator outside the while loop, as we need to define the iterator manually. “i” is the iterator defined for the outer for loop.
- Then, the outer while loop is implemented, running from the iterator (1) until 8 (including 8), as we’ll be printing 8 columns of stars*.
- Inside the outer while loop, another iterator, “j,” is initialized for the inner while loop, as it’ll be used to print the stars in the row.
- Then the inner while loop is initialized, running from the iterator (1) until the value of iterator “i” (including the value of i), which will print the stars* in the row.
- Inside the while loop, we’ve included a statement to print stars, which will be printed in each row as per j’s value.
- After printing each respective star, j is incremented until the value of i, prints the precise number of stars in the row, and the inner loop ends.
- After the inner while loop ends, an end-line statement is printed to print the stars in different columns.
- And then, the iterator “i” is incremented to the next number for printing the stars in the next row.
- And Finally, the outer loop ends with the program respectively.
Let's Understand it more practically.

In the first place, when (outer loop's iterator -> ) i is 1,

the (inner loop's iterator -> ) j also runs from 1 until 1, printing just the one *

Then, after one session of the inner loop, an end-line statement gets executed to get into the next line.

Similarly, when i becomes 2, in the second line, the j also becomes 1, then prints *, then j turns 2, and again it prints another star. Therefore ** in total.

End-line statement gets executed.

i becomes 3, and j runs like (1-2-3) and print 3 stars (1 in each turn) stars. *** in total.

And the program continues until 9 and terminates as both conditions are satisfied.Infinite While Loop
An infinite loop is a condition that iterates over and over infinite times, as the loop condition never gets satisfied as per the flow of the program. In this situation, the program never gets executed entirely; programmers have to terminate the program flow manually to stop the execution of the program.
Most of the time, this situation occurs due to logical & programmatic errors or due to negligence of the programmer. Hence it’s an error scenario in most cases. But there are also some scenarios where we intentionally use an infinite loop; for example, I’m using it right now to teach you guys and make you aware of the infinite loops (XD).
Example
#include <iostream>
using namespace std;

int main(){
    int i=1;

    while(i<10)
    {
        cout<<"Geeky Time XD"<<endl;
        cout<<"Powered by GeekonPeak"<<endl;
        cout<<endl;
    }


    return 0;
}Output
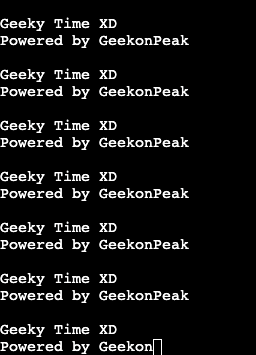
Explanation
The Output is way simpler than the program seems to be:
- Firstly, we’ve initialized an iterator “i” to the value of 1.
- Then we initialized a while loop with the condition that the loop should run until i is less than 10,i.e., i need to be at 11 to satisfy the loop and continue the remaining program flow.
- Then the value of i never changes as there’s no increment statement; hence the value of i remains 1 forever, and the loop continues until infinity.
The Program
Objective
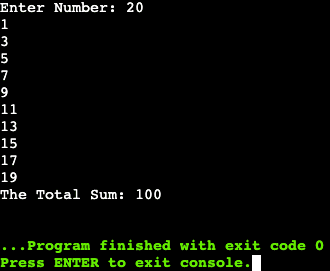
Write a Program using a While loop to calculate the sum of positive odd integers till the number provided by the user.
The Code
#include <iostream>
using namespace std;

int main(){

    //Part 1: Taking User Input
    int num;
    cout<<"Enter Number: ";
    cin>>num;
    int sum=0;

    //Part 2: Calculating First N Odd Numbers and their Sum
    int i=1;
    while(i<=num){

        if(i%2!=0){
            cout<<i<<endl;
            sum=sum+i;
            i++;
        }
        else{
            i++;
            continue;
        }
    }

    //Part 3: Printing the Final Output

    cout<<"The Total Sum: "<<sum<<endl;

    return 0;
}Output
Explanation
In the first part of the program, we’re simply taking the user input and storing the input in the num variable.
Besides, we’ve also created a sum variable with the value 0 to store the final sum of the program in it.
//Part 1: Taking User Input
    int num;
    cout<<"Enter Number: ";
    cin>>num;
int sum=0;In the second part of the code, which is indeed the main part:
- We’re starting by manually initializing an iterator “i” to the value 1.
- We then call the while loop with the condition of i less than equals to the num (user input). This means that the program will loop and iterate from 1 to the number the user enters, including the user’s number.
- Inside the while loop body, there is an if-else statement. Now you need to understand carefully.
- If the iterator’s value is divided by 2 and does not give 0 as the remainder, it means it is an odd number. And If a number turns out to be an odd number, the code will enter into the if block; otherwise, the else block.
- Inside the if the block of code, there’s firstly the print statement to print all the odd numbers, then the numbers are added to the sum variable for the final output. In the last, there’s an incrementing iterator statement to proceed with the loop statements of the program.
- In the else block of code, there’s just an incrementing iterator statement to proceed with the program and the continue statement to skip all the even numbers of the iterator.
    //Part 2: Calculating First N Odd Numbers and their Sum
    int i=1;
    while(i<=num)
    {

        if(i%2!=0)
        {
            cout<<i<<endl;
            sum=sum+i;
            i++;
        }
        else
        {
            i++;
            continue;
        }
}In the third part finally, there’s just the print statement to display the total sum of all the odd numbers.
    //Part 3: Printing the Final Output

    cout<<"The Total Sum: "<<sum<<endl;

    return 0;
}The Program
Objective
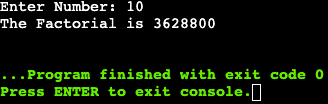
Write a Program using the while loop to calculate the factorial of the number provided by the user.
Note: Factorials are large values to store, so here we’re considering the factorial input as a non-zero value until 20 To work give the correct value.
The Code
#include <iostream>

using namespace std;

int main(){

    //Part 1: User Input

    long int fact = 1;
    int num;
    cout<<"Enter Number: ";
    cin>>num;

    //Part 2: Factorial Calculation

    int i = num;
    while (i >= 1)
    {
        fact*=i;
        i--;
    }

    //Part 3: Output

    cout<<"The Factorial is "<<fact<<endl;


    return 0;
}Output
Explanation
In the program’s first part, we’ve initialized a long integer variable named fact with the value of 1, which will store the factorial. As factorials can be really big to store, normal integers could be small enough to store the bigger values.
Then we simply initialized a num variable and stored user input into it.
//Part 1: User Input

    long int fact = 1;
    int num;
    cout<<"Enter Number: ";
cin>>num;Progressing towards the main part, i.e., Part 2 of the program:
- Here we’re initializing the iterator and assigning the value of num to the iterator. As we know, factorial runs like 5! = 5*4*3*2*1 (* means multiply). Here we’re also trying to achieve the same by assigning the user input’s number to the iterator and decreasing it until 1 while multiplying it with the fact variable to store the factorial.
- Then we used the while loop with the condition to run the loop until the iterator is greater than equals 1 (i.e., including 1).
- Inside the loop body, the fact is multiplied by the iterator, and the iterator decreases until it reaches 1.
- This means every number less than num is multiplied and stored in the variable fact until 1. Hence complying with the definition of the factorial.
//Part 2: Factorial Calculation

    int i = num;
    while (i >= 1)
    {
        fact*=i;
        i--;
}In the last part, the output of the factorial is printed to end the program.
//Part 3: Output

cout<<"The Factorial is "<<fact<<endl;Conclusion
In this blog, we’ve thoroughly gained knowledge of the loops and gone through the concepts of looping and iteration. The manual iterator and the loop execution of the while loop are the major topics covered in this video to extend the scope of the learners’ learning. The major subtypes of the while loop, including the nested while loop with detailed condition checks, are also included in this tutorial. We’ve also gone through the infinite loop issue and some real-life problems, programs, and scenarios that should help you to solve the framed interview questions.
In the upcoming blogs, you’ll get exposure to do-while loop, continue statements, and break statements. Also, check out previous tutorials, including for loop and if-else block of statements. This will complete the entire tutorial series course for C++ beginners to intermediate. After the C++ beginners to intermediate, the geeks plan to expand the peak with more extensive tutorials to enhance the learning base and provide more exclusive and practical learning.
This is also one of the most detailed blogs ever, and it took a lot of money & effort to upgrade the blog’s quality to this level. We’ve just begun. We’ve constantly improved the quality to enhance your experience, which shall require your support, and we expect it from you.
We shall start accepting donations soon as we’re spending heavily on the website’s maintenance and super high-quality content creation & research of the website. You can now support us through the like button on the bottom, sharing this blog, disabling ad blockers, commenting on your thoughts, and connecting with us on socials.
You can also support us by visiting this blog and buying the reviewed services (They’re tested and the best in the market), which will help us grow, develop, and upgrade the content quality to the next level. You may also subscribe to our newsletters, check out our latest blogs from other niches, and hit a like (heart) below the blog. Perfect Goodbye for now, and enjoy the ever-best programming blog series only at GeekonPeak!