Programming is a robust and flexible practice; it always allows programmers to perform tasks more efficiently. Almost every time, it has more effective ways to perform a specific task than the programmer thinks of, and it could also have a better solution than your plan A & plan B both. As a newbie geek, you’ll have to learn many new things to perform magic. One such magic is C++ Switch Statements.
Let’s take a similar real-life example, what if a programmer has more than 10 possible scenarios in his/her code? Then we expect him/her to code 10 if-else if-else ladder blocks, but can we figure out a better way out of it? Yep, the Switch statement is just the thing that makes it shorter, easier, and more efficient, and it also makes the code readable.
C++ Switch Statements

C++ Switch statements or Switch case statements are conditional statements that allow the programmers to define the situations according to the programming cases or the program result as per the list of values.
The Switch statement efficiently deals with multiple cases, especially a code with many possible outcomes.
The Switch Statement also has a default case, which gets executed when none of the predefined cases gets match the execution of the program.
You must remember these fundamentals while initializing the switch statement:
- The case value in the switch must be either integral type, enumeration type, or class type, which should not have an ambiguous conversion towards integral type. In most cases, we should use ‘int‘ or ‘char‘ values in the case to be enumerated.
- There can be any number of cases, but each case should be unique. Therefore duplicate case values are not allowed.
- break and default are optional to use in every case.
Diagram
Explanation
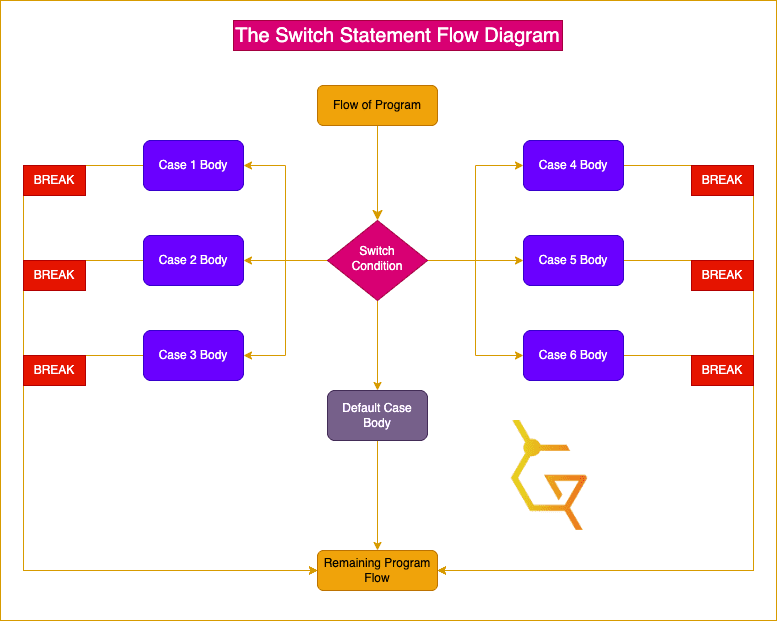
The diagram, which can seem tedious, is nothing more than just a game of teddy:
- Firstly, the flow of the program encounters the switch statement, where the switch statement has to make the decision.
- If the result of the switch statement concludes with the output of case 1, then the code in the case 1 body will execute.
- As the switch statement concludes with the result according to the specific case, i.e., cases 2, 3, 4, 5, and 6, the code block in the corresponding case will execute.
- After the execution of each case’s code block, the break keyword/break statement is necessary unless it will override and execute the code block of its next case.
- The default case will be executed if the switch statement’s output does not match the cases defined in the switch.
- As the default case is the last case of all, we don’t need the break keyword/statement in the default case.
- After the successful execution of any specific case, the program control flow will exit from the switch statement and execute the remaining program.
Syntax
switch (expression){
    case value1:
        //case....body....
        break;
    case value2:
        //case....body....
        break;
    case value3:
        //case....body....
        break;
    default:
        //default-body....
}Explanation
The Syntax of the switch case statement is nothing but a piece of cake to understand:
- First, call the switch with an expression in there; here, the expression means the variable, which can have different outputs/cases.
- Open the switch block, and inside the switch block, use the ‘case‘ keyword with the possible output of the expression you’re expecting from the program. Make sure to end the case with the colon (:).
- Below the case, enter the lines of code you want to execute if the output matches the case; this is like if/else. If the output of the variable is evaluated as the case, then the lines of code entered below the case will be executed.
- Ensure the lines of code are indented and end with the break keyword; otherwise, all the cases’ lines of code will be executed until the break function is called.
- In the end, use the default keyword; this will work as else in if-else; if the output is not matched with any of the cases above, then the lines of code in the default block will be executed.
- The break statement is not needed in the default statement.
Example
#include <iostream>
using namespace std;

int main(){
    int month;
    cout<<"Enter Number (1-12): ";
    cin>>month;

    switch(month){
        case 1:
            cout<<"January"<<endl;
            break;
        case 2:
            cout<<"Feburary"<<endl;
            break;
        case 3:
            cout<<"March"<<endl;
            break;
        case 4:
            cout<<"April"<<endl;
            break;
        case 5:
            cout<<"May"<<endl;
            break;
        case 6:
            cout<<"June"<<endl;
            break;
        case 7:
            cout<<"July"<<endl;
            break;
        case 8:
            cout<<"August"<<endl;
            break;
        case 9:
            cout<<"September"<<endl;
            break;
        case 10:
            cout<<"October"<<endl;
            break;
        case 11:
            cout<<"November"<<endl;
            break;
        case 12:
            cout<<"December"<<endl;
            break;
        default:
            cout<<"Invalid Input!"<<endl;
    }
    return 0;
}Output
Explanation
Let’s get with the explanation of the simple switch example:
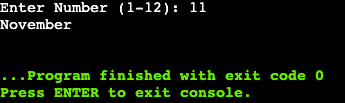
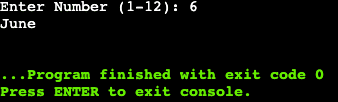
- Initially, we created an integer “month“ variable and asked for user input from 1-12.
- Then the Switch statement is called with the month as an expression.
- Inside the switch block, there we’ve created 12 cases.
- In Case 1, which means the user input should be 1, January will be printed using cout and the end line statement. Similarly, in Case 2, February will be printed, 3 should be March, and there is a total of 12 cases all the way up to Case 12 -> December.
- After the code of each case, the break statement is also there.
- Ultimately, the default case is printing “Invalid Input.” This will be executed if the input is not from the above-mentioned cases. And we already know the break statement is not required in the default case.
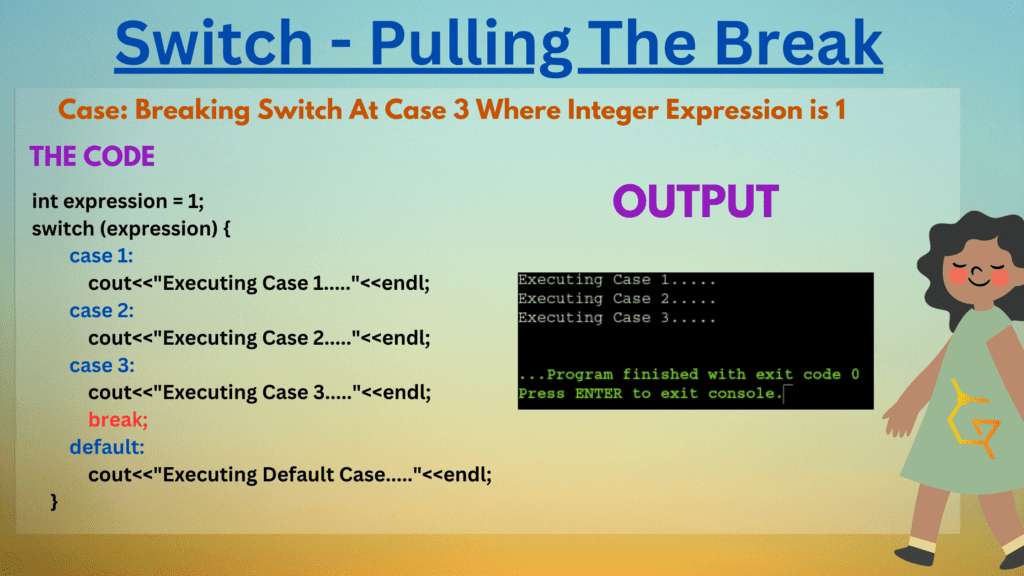
Switch – Pulling the Break
The switch statement can also be used without the break statement, but the situation differs from case to case. There are various cases where the switch statements tend to be used without break statements, as per the logic of the code.
Let’s understand this concept using the images below to gain more clarity on this case.
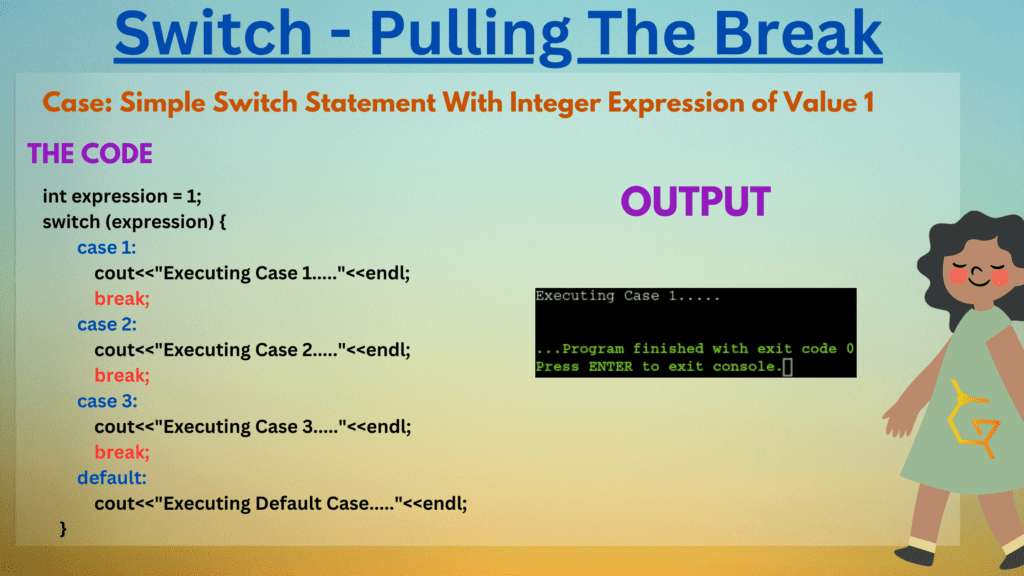
In the image above, You can interpret the following:
- A variable names expression is assigned with the value 1.
- The expression is used in the switch case as input.
- If the expression turns 1, case 1 will be executed with the output “Executing Case 1……”; very similar outputs are also there with case 2 and case 3.
- The default case also has the output “Executing Default Case…”. Hence the code is pretty straightforward.
- The break statement is interesting, as the topic is about pulling the break.
- All the cases, i.e., case 1, case 2 as well as case 3, has got the break statement after the end of their lines of code.
- Therefore, the case and output will only be executed per the expression. The other cases will not be executed. It’s a simple code of a simple switch statement, nothing special.
As we’ve already gone through the main switch statement case, Let’s understand what’ll happen when we don’t use a break statement in some cases:
- A variable names expression is assigned with the value 1.
- The expression is used in the switch case as input.
- If the expression turns 1, case 1 will be executed with the output “Executing Case 1……”; very similar outputs are also there with case 2 and case 3.
- The default case also has the output “Executing Default Case…”. Hence the code is pretty straightforward.
- The break statement is the main element, as the output differs from the typical switch case example (explained above).
- Here, the break statement is not present in cases 1 and 2, and it’s just present in case 3.
- Hence in the output, we’ve called case 1 using the expression, and all the expressions below will also get executed until the break statement is called.
- This states that all the codes will be executed from the called case until the break statement is called.
Here you’ve got to understand the basic concept of using break statements in the switch case. But there could be some cases where we would avoid using a break statement after each case, like when you want the same output for more than one case. Let my geeky example give you clarity on this one.
Example
#include <iostream>
using namespace std;

int main(){
    char ch;
    cout<<"Enter a Character: ";
    cin>>ch;

    switch(ch){
        case 'a':
        case 'A':
        case 'e':
        case 'E':
        case 'i':
        case 'I':
        case 'o':
        case 'O':
        case 'u':
        case 'U':
            cout<<ch<<" is a vowel."<<endl;
            break;
        default:
            cout<<ch<<" is not a vowel."<<endl;
            cout<<"It is a consonant."<<endl;
    }

    return 0;
}Output
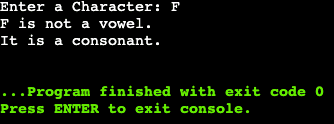
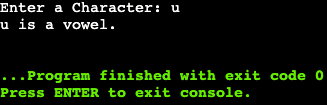
Explanation
This program tells which character is a vowel and a consonant. The code is also pretty simple to understand; use a lil-bit of the brain:
- Beginning with initializing the character ‘ch‘ and taking the user input of the same.
- Then we’ve called the switch statement with ‘ch‘ as the expression. Based on the output of using the switch statement will be executed.
- We’ve subsequent cases of all the vower characters inside the switch block like a, A, e, E, etc.
- And after all characters are completed in the last case, we’ve given the output ‘ch’ is a vowel. In the last case only, the break statement is there, as we don’t want to execute default statement codes in the row.
- If the cases don’t match with the user input, the default is already there with the output of consonant.
- We can use this method to execute the same code for multiple cases.
The Program
Objective
Write a Program that prints the area of 4 basic shapes (Circle, Square, Rectangle, and TRIANGLE) by taking the basic input values.
The Code
#include <iostream>
using namespace std;

int main(){

    //Part 1: User Input & Selection Menu

    int choice;
    const double pi = 3.14;

    cout<<"Calculating the Area--------->"<<endl;
    cout<<"1 - Triangle"<<endl;
    cout<<"2 - Circle"<<endl;
    cout<<"3 - Square"<<endl;
    cout<<"4 - Rectangle"<<endl;
    cout<<endl;
    cout<<"Your Choice: ";
    cin>>choice;
    cout<<"-------------------------------------"<<endl;

    //Part 2: The Main Game

    switch (choice){

        case 1:
            double base,height;
            cout<<"Enter Base: ";
            cin>>base;
            cout<<"Enter Height: ";
            cin>>height;
            cout<<"Area: "<<0.5*base*height<<endl;
            break;
        case 2:
            double radius;
            cout<<"Enter Radius: ";
            cin>>radius;
            cout<<"Area: "<<pi*radius*radius<<endl;
            break;
        case 3:
            double side;
            cout<<"Side: ";
            cin>>side;
            cout<<"Area: "<<side*side<<endl;
            break;
        case 4:
            double length,width;
            cout<<"Enter Length: ";
            cin>>length;
            cout<<"Enter Width: ";
            cin>>width;
            cout<<"Area: "<<length*width<<endl;
            break;
        default:
            cout<<"Invalid Input!"<<endl;
    }

    return 0;
}Output
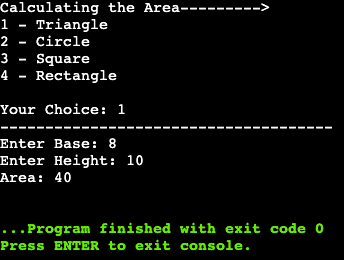
Explanation
This could be one of the most exciting programs you’ve ever gone through in C++, understand this program properly, and you’ll have exposure to one of the most important topics of C++.
As we interpret the first part, we’ve initialized an integer ‘choice,’ and we’ve also declared a double constant of ‘pi‘ to 3.14.
Then we have a menu for selecting the figure for area calculation and user input according to the user’s desire to choose the figure from the triangle, circle, rectangle, and square.
//Part 1: User Input & Selection Menu

    int choice;
    const double pi = 3.14;

    cout<<"Calculating the Area--------->"<<endl;
    cout<<"1 - Triangle"<<endl;
    cout<<"2 - Circle"<<endl;
    cout<<"3 - Square"<<endl;
    cout<<"4 - Rectangle"<<endl;
    cout<<endl;
    cout<<"Your Choice: ";
    cin>>choice;
cout<<"-------------------------------------"<<endl;Here the main game begins in part 2; the switch statement is being called with the choice variable as the expression for the decision of the switch case.
In the first case (if the user selects the triangle), it’s simple, the double variables, i.e., base and height, are initialized, then the program asks for user input of base and height.
According to the input, the area will be calculated and printed with the formula: 1/2*base*height. Just for reference: (1/2 = 0.5)
In the end, the break statement is to terminate the switch flow after printing the area.
case 1:
            double base,height;
            cout<<"Enter Base: ";
            cin>>base;
            cout<<"Enter Height: ";
            cin>>height;
            cout<<"Area: "<<0.5*base*height<<endl;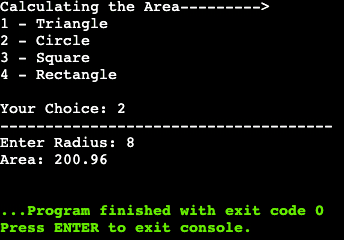
break;Here in case 2, the double radius variable is initialized, and the radius will be taken by user input and the area will be calculated with the area of the circle formula, i.e., pi*radius². Just for reference: (radius² = radius*radius).
Followed by the break statement to terminate the switch flow after printing the area.
case 2:
            double radius;
            cout<<"Enter Radius: ";
            cin>>radius;
            cout<<"Area: "<<pi*radius*radius<<endl;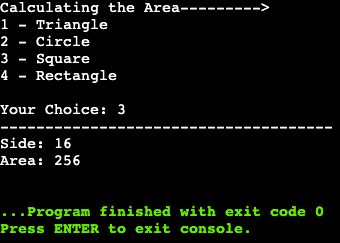
break;Case 3 is even simpler, The double variable side is initialized, and user input is taken into the side. Then it is squared as per the formula of the square, and output is provided.
Followed by the break statement to terminate the switch flow after printing the area.
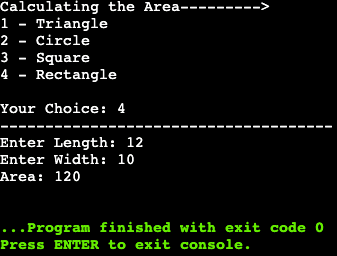
In case 4, another set of double variables, i.e., length and width, are initialized, then the user input for length and width is taken and multiplied as per the formula of the area of the rectangle; Finally, output with your displayed as per calculated answer! as simple as it is.
case 4:
double length,width;
cout<<"Enter Length: ";
cin>>length;
cout<<"Enter Width: ";
cin>>width;
cout<<"Area: "<<length*width<<endl;
break;After all of the possible cases as per the program, the default case is to handle if the user input is not within the range of the program. It simply outputs the Invalid Input and Exiting and exits the program.
Here’s an overview of part 2 of the program:
//Part 2: The Main Game
switch (choice){
case 1:
double base,height;
cout<<"Enter Base: ";
cin>>base;
cout<<"Enter Height: ";
cin>>height;
cout<<"Area: "<<0.5*base*height<<endl;
break;
case 2:
double radius;
cout<<"Enter Radius: ";
cin>>radius;
cout<<"Area: "<<pi*radius*radius<<endl;
break;
 case 3:
            double side;
            cout<<"Side: ";
            cin>>side;
            cout<<"Area: "<<side*side<<endl;
            break;
case 4:
            double length,width;
            cout<<"Enter Length: ";
            cin>>length;
            cout<<"Enter Width: ";
            cin>>width;
            cout<<"Area: "<<length*width<<endl;
            break;
default:
            cout<<"Invalid Input!"<<endl;
}Conclusion

C++ Switch Statements is indeed the last blog of the C++ Beginners series, and you’ve successfully completed the C++ Beginners tutorial series. If you’re new and want to learn core C++ basics and want to excel in programming, click here to check out our C++ Roadmap. But if you’re starting, you can also access our C++ Beginners Blog List from the sidebar (top left corner below GeekonPeak’s logo).
After learning C++, you’re not done yet; You Must check out other programming languages such as Java and Python to upskill yourself, and keep practicing your skills and codes to solve real-time problems as that’s how your problem-solving skills improve in real life after learning to code.
And it’s just the beginner to intermediate tutorial series; even C++ still needs to be finished; we’ll be back soon with new tutorial blogs with innovative methods of learning new and advanced topics. Until then, you can only check out other top-notch geeky blogs at GeekonPeak.
This is also one of the most detailed blogs ever, with the latest and modern compiler-friendly code editor, and it took a lot of money & effort to upgrade the blog’s quality to this level. We’ve just begun. We’ve constantly improved the quality to enhance your experience, which shall require your support, and we expect it from you.
We shall start accepting donations soon as we’re spending heavily on the website’s maintenance and super high-quality content creation & research of the website. You can now support us through the like button on the bottom, sharing this blog, disabling ad blockers, commenting on your thoughts, and connecting with us on socials.
You can also support us by visiting this blog and buying the reviewed services (They’re self-tested and the best in the market), which will help us grow, develop, and upgrade the content quality to the next level. You may also subscribe to our newsletters, check out our latest blogs from other niches, and hit a like (heart) below the blog. Perfect Goodbye for now, and enjoy the ever-best programming blog series only at GeekonPeak!